Installing Scrivener on Linux
Authenticated with the License Servers, running the 64-bit versions as well...
So if you’re here, odds are you found this post in a search or I linked it somewhere. I won’t detail what Scrivener is, but I will say that it is worth it.
Normally I do my writing within it on my Windows PC or my iPad + Keyboard. But recently I refurbished my old 2010 Macbook Pro. For reasons outside of the scope of this post, I cannot update the OSX on it any further, so my choice to keep the still quite functional laptop working was to install Linux. In this case, since I had minimal experience with this specific distro, and wanted more exposure and experience with it, I went with Kali Linux. But your mileage may vary. It did let me name the machine “Knick Knack Kali Mac.” Which makes my kids giggle for some reason.
Linux used to be a supported platform for Scrivener, but it is currently not. So, I went about getting Wine installed so I could run my Windows version. For reasons out of the scope of this document, Scrivener is no longer supporting 32-bit, and I’m running 3.1.5.x on my PC which is 64-bit. Naturally, I wanted the same version as well.
Except in my “Is this possible?” searches a few results state, in a nutshell “Yeah, the current version doesn’t work right.” You have to do this round-about usage of the 32-bit version (Praise to them for keeping older and unsupported versions available) Upgrade, and even then the results were hit-or-miss on the 64-bit version.
Since basically 100% of you have no idea who the hell I am, I am obviously far better at Linux than I am at Writing Fiction. So, because procrastination is more powerful than productivity, I am writing up how I installed Scrivener 64-bit AND have it working with the license server, with no headaches because someone else might be asking the same question I did.
This worked for me, I did it multiple times, and I even did it in VMs as a test. It might or might not work for you in your environment. Caveat Emptor. Do Not Taunt Happy Fun Ball.
Requirements: A License to Scrivener 3 for Windows, Debian-based Linux install, and root/sudo access to it. I’m positive Redhat-based Linux and others work just fine, however, I am using Debian and Kali the most right now and the commands here are all for that version. (The trial installs and runs just fine, but this article is how I got it to work and licensed.)
For the purposes of this article, I am doing this in a VirtualBox VM of a fresh Kali Linux install.I have done this and run this on actual hardware. I DO NOT have Wine installed on the VM at this point. Nor do I have a .wine/ directory/environment set up. IF you have an already existing .wine/ you might want to use a different environment/prefix until you get it proven out that I’m not a knob.
Step 1: Download Scrivener for Windows.
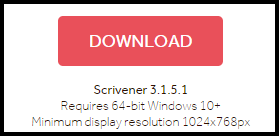
URL is here: https://www.literatureandlatte.com/download?product=Scrivener You need the Windows-64-bit version. As of this article, the button you need looks like this.
You don’t -have- to do this step first, just do it before you need the file later on. I just ran this step first because I made the screenshot of the button first. Just do it somewhere before Step 4. Or don’t, I’m not your dad.
Step 2: Enable i386 Architecture.
There may be reasons why you don’t want to, there may be reasons why you can’t. This seems to be necessary and I have not delved extremely deeply into it to work out the reason. Sudo or run as root:
sudo dpkg --add-architecture i386
(Yes, I’ve sudo’ed to root in this screenshot. This is my VM, Don’t lecture me on why I should not, I’m trying to get this instruction set up before executive dysfunction, ADHD, or who knows interrupts my flow. If you have non-copy-pasted reasons not to do this, that’s fine, but this VM will survive only as long as I need to document this properly.)
After that, update your apt cache/sources.
sudo apt-get update
Step 3: Install Wine and Dependencies
sudo apt-get install winetricks wine64 wine32:i386 winbind
(update: if ‘wine32:i386’ doesn’t work just use ‘wine32’)
I want to keep all command lines short if I can because you might be reading this on one computer and typing on another.
This will install what seems to be a frightening amount of things. On my VM it filled most of the command terminal with what feels like a bajillion packages. Nearly all of them are for wine:i386. But this is okay. Trust in The Force my friend.
Step 4: Install Scrivener
We don’t want to run Scrivener as root. We really don’t want to use root more than necessary. So we’re doing everything we can in userland, and only using root When Necessary. In fact, I’m no longer in root for the rest of this process. Yes, you CAN run everything here as root, but good practices are that you don’t do that. Look, if you’re trying to run Scrivener on Linux, you already know all the arguments for/against it. I’m not holding your hand and if you break something that is all on you. You won’t need to be rooted past this point.
wine ~/Downloads/Scrivener-installer.exe
(IF your downloads are in a different directory, you will need to adjust the command line. This is done with the default Firefox browser, as Default As Possible, and the default puts downloads in ~/Downloads/ ) The only thing I do differently from the default install is I put Scrivener in the root of C in an easier directory for scripting for later on. This way I don’t need to escape the space in “Program Files”
And I don’t let it do the Desktop Icons.
Mainly because they won’t work and I’ll be making my own. I’ll show you how to set up an easy script to run Scrivener later on.
Step 5: winecfg
Start the wine configurator
winecfg
Error Checkpoint: If you get the below:
wine: could not load kernel32.dll, status c0000135
Then what this means is your current wine environment was set up before the i386 components are installed. Sorry, you’ll have to rm -rf your ~/.wine/ directory. Then I’d suggest it is best if you do an apt-get update && apt-get upgrade and then you return to Step 2 and go from there. If you don’t want to delete your ~/.wine/ make a different wineprefix and use that. This is outside the scope of this document. Your mileage may vary.
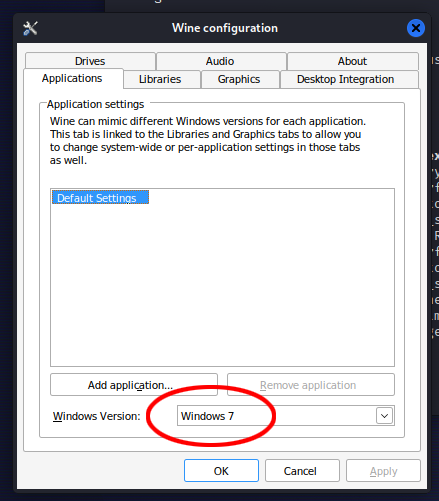
See that “Windows 7” there? Use the pulldown thingy and Make it say Windows 10.
Click “OK”. This config is key. While it -runs- under Windows 7 mode, you don’t want to in this case.
Step 6: Winetricks and .NET 4.8
From the command prompt run:
winetricks dotnet48
This will install the .Net frameworks and so on. Install every app it asks, sorry, those are required. It will throw up spooky warnings. It will seem scary, you’ll see things like “WARNING:” and so on. Be bold, be brave. You Will Succeed, It is inevitable. This is an adventure. It will LOOK like it is reinstalling or looping many times. But what it is doing is installing any pre-requisites to get you to .Net 4.8 On mine it installs 4.0 and then the others on up until it gets to and installs 4.8.
Step 7: Delete TextToSpeech
Yes. Scrivener has Text to Speech. Most people don’t know that. However, it is broken right now. Go into your install location. If you chose a different directory than I did in Step 4 your commands will vary.
cd ~/.wine/drive_c/scrivener
Now, we need to delete the texttospeech directory. If we do not, Scrivener will hang upon launch. You will see a message in the terminal that is a flood of ISpDataKey::EnumValues failed disabling Text to Speech is how to solve this, while there is a DLL you can also remove, I simply just remove the directory.
rm -rf texttospeech/
Step 8: Launch Scrivener
Yes. part of this command is redundant. However, I use this command since I will be using a version of it later for a shell script to make Scrivener startup easier.
cd ~/.wine/drive_c/scrivener && wine Scrivener.exe
The familiar first-start of Scrivener will show up, there will be a -LOT- of lines, especially font-related lines in the terminal. Don’t Panic.
From this point, go through your usual Scrivener Fresh Install Starting. I just click Next or whatever, I’ve done it a lot, and I don’t think much about it. Until I get to this:
Which is normal. You should be used to this. You CAN click “Continue Trial” but we’re using software we have a license for, and the purpose of this is to register Scrivener. Click the Enter License button.
I have of course blocked out my email address and License Code. Click Activate License of course.
You should see it in the terminal if you are curious (and validating!)
Of course the more important and familiar:
Click OK of course. Take a victory lap.
Step 9: Launching Easier
Create a shell script in your home directory with your favorite editor.
vi scriv.sh
all you need is the command from Step 8. I added the explicit path to wine for sanity.
cd ~/.wine/drive_c/scrivener && /usr/bin/wine Scrivener.exe
Save this, chmod +x so you can run the script:
chmod 0700 scriv.sh
Now, this is where YOUR choice in not only Linux distro, but Window Manager will determine how you do things. I’m using Kali Linux with XFCE, It is up to you to work out how to do this if you are using Gnome or KDE or what have you…
You can simply move the script to somewhere in your PATH. Run this script, and Scrivener starts.
I created a desktop launcher so I can just double-click and it Just Runs. Right click on the XFCE desktop and choose “Create Launcher” The settings I use are:
You will need to alter this to suit your configuration. Click “Save” and give it a try. Check it out, no terminal flooding your vision, distractions preventing you from writing are on you now.
Conclusion
And there you have it. Scrivener 64-bit running under Linux with Wine AND authenticated with the license server. No fancy command line to remember.
Defeating Writer’s Block is left an exercise to the user. If you have success please let us know.
What I’ve personally done is connect Dropbox and map the directory I have for my writing to a location that Scrivener can access. That is outside the scope of this document.
I will edit this of course as needed. If you need help on anything please let me know.
Additional 1:
Font size within the application. If your linux desktop has a high enough resolution/screen size the UI within Scrivener may be hard to read. Two places to fix this are within the UI Font Display panel (Since that differs with Desktop Environment I do not have screenshots here.) OR Within Wine itself.
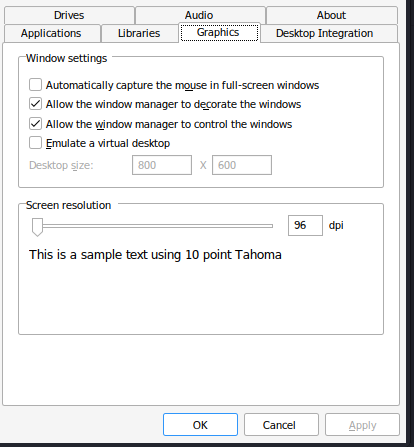
Re-open winecfg (As seen in Step 5 above) and under the “Graphics” tab is the Screen Resolution slider that may be the best option for what is needed.


This is an awesome guide - for what it's worth, it does seem like using Bottles (from Flathub) can replace a lot of the wrangling with installing system versions of Wine - for me, using Bottles meant the only other things I needed to do were use its dependency manager to install dotnet48, and deleting the texttospeech directory as indicated.
I followed the instructions with Linux Mint and XFCE. It all worked. I had to follow the Recovery method for the Activation key. I bought Scrivener in the pre-COVID era and it looks if there has been a change. Did hackers try something?
Thanks for the instructions.